User Interface

There are several display and interaction standards used throughout LapTimer. This section addresses some of them.
-
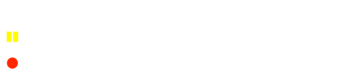
✦Most views show the LapTimer status in the navigation bar:
Timer Status
View Management
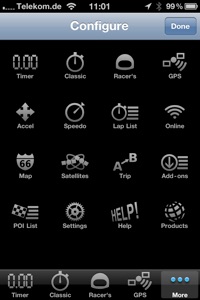
When LapTimer was built initially, it had only one view, the analog stopwatch know as ,Classic‘ view. During further development, the view concept was expanded to the iPhone Tab Bar featuring several views, including three timer views. The views available are mainly determined by the Standard or Professional version. Please see LapTimer Products for a detailed list.
As current versions of LapTimer feature more than 5 views, the Tab Bar can be expanded. Press ,More‘ to see not only the four favorite views, but a collection of all views available. You can rearrange and select the favorite views by pressing ,Edit‘ and dragging the icons around. LapTimer will store your personal preference and present the arrangement next time LapTimer is started.
A timer view is a view that shows the current lap time - it can be compared to a stopwatch.
Timer Views
The Racer View includes the most comprehensive information for regular lapping. As a special feature, it includes a kind of ,ghost‘ known from racing games. Using this ghost, you are able to compare your current time to a reference lap at any time in track.
In versions 9.x, the Standard version of LapTimer features the ,Classic‘ and ,Racer‘ timer view, the Professional version adds as basic view simply named ,Timer‘ (available in Standard using In App Purchase). These timer views can be selected by situation and taste.
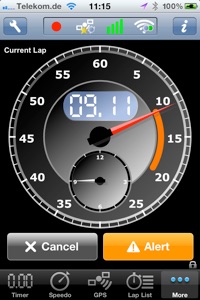
The Classic View features an analog stopwatch and simulates a realistic clockwork. It shows the current time lapped both as analog and digital display. The large hand shows seconds, the small one minutes.
In addition, LapTimer shows an orange countdown segment (and beeps) when the current time nears the reference time (last, best, or any selected, more on this later on).
It is important to understand how LapTimer compares with reference laps. Firstly, the reference lap is a lap driven at any time in the past. It can be selected either manually (i. e. you select a specific lap / lap time and define this lap as the reference), or automatically. Normally, you will use automatic selection of reference lap. LapTimer can be configured to either select the best lap driven so far, or the lap you finished last.
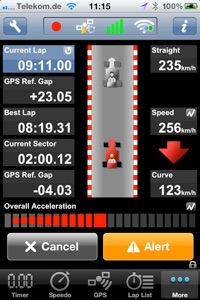
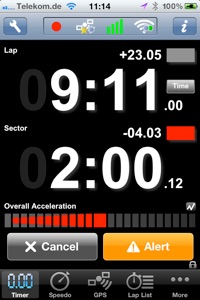
Lets go through the fields of Racer View one by one. The ,Current Lap‘ (here 9 minutes and 11 seconds) shows the time since passing the starting line.
The ,GPS Ref. Gap‘ shows a comparison of your current performance to the reference lap. This is done by finding the position on the reference lap nearest to your current position.
,+23.05‘ means it took you more then 23 seconds more to reach this point on track compared to the reference lap. You will hardly make a new best time here :-) As you are behind your reference time, the gray ghost car is ahead of you.
The field ,Best Lap‘ shows the final time of your reference lap, in this case automatic best time selection of reference laps is selected (otherwise the title would change to ,Last Lap‘).
The remaining fields on the left show the same status within the current sector. As long as you do not record intermediates, this fields will show the same values as the overall lap fields.
To the right, the Racer View shows current speed and last cornering and straight speed. This are very important indicators for improving your line and understanding speed limits.
The Timer View is a simplified version of Racer View, it displays current lap and sector times absolutely and relative to the reference lap. The color indicators give a quick indicator where you are. A red square means you are ahead, a gray square means you are behind reference. In the example to the left, you are overall behind but run a great sector.
Like in the Racer View, the Timer View features a Acceleration display. The acceleration shows the combined lateral / lineal acceleration in real time. The colors selected for the specific force can be configured in LapTimer‘s Settings. I use red color when acceleration reaches 1.2g. The values you can drive without danger, depends on the car you drive however... And you cannot make the same acceleration in any surface and weather condition.
In the bottom of each timer view, there is a list of context sensitive buttons for manual lap timing. Manual lap timing means that starting and stopping the timer is not done automatically (using triggers) but by pressing the respective buttons. Actually this is an anachronism with its roots in the time when LapTimer was as simple stopwatch. As it is fine for testing purpose, they are still available.
Although manual operation records time and data as in automatic mode, this will not introduce triggers!
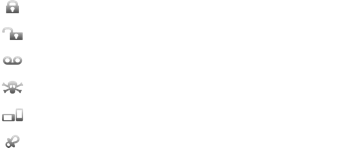
The following list shows all buttons that can appear in this area. Buttons show up only when they make sense in the respective situation / LapTimer status.
Standard View Features

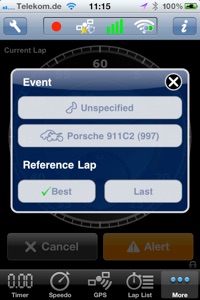
This is probably the right time to introduce the context lap timing is performed in, the so called ,Event‘. The context is made up from the current track, the vehicle driven, and the selection of the reference track. The hover view presenting the event can be brought up by pressing the tool button ( ) available in the navigation bar. Single tapping into the view brings up and dismisses then hover view too.
Pressing either the track or the vehicle button brings up a list of alternatives and allows both selection, and addition/ deletion of values available.
Using the ,Reference Lap‘ buttons, automatic selection of reference laps can be chosen. LapTimer will always select the best (or last) lap driven with the track and vehicle selected.

Manual selection of reference laps is done in the ,Lap List‘ introduced later. Manual selection means you select a specific lap driven in the past. In case a manual selection is in place, the hover view above shows a third button presenting the database index of the lap.
Lap List View
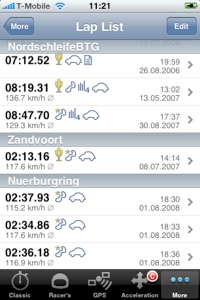
The Lap List View is the primary entry point to LapTimer‘s database of laps driven and detail informations gathered. It is furthermore the place to drill down into the GPS and acceleration recorded while lapping.
LapTimer‘s lap database is made up from a list of laps driven. Each lap has a unique index.
The primary sorting criteria is the track the lap belongs to, the secondary is the date and time.
A lap can be deleted by swiping your fingers across the respective row. More sophisticated data maintenance is available by pressing ,Edit‘.
Besides basic data like the time lapped, average speed, and date / time, each lap is decorated with a list of icons. This icons should give you a quick impression of the status - without need to go one level deeper.
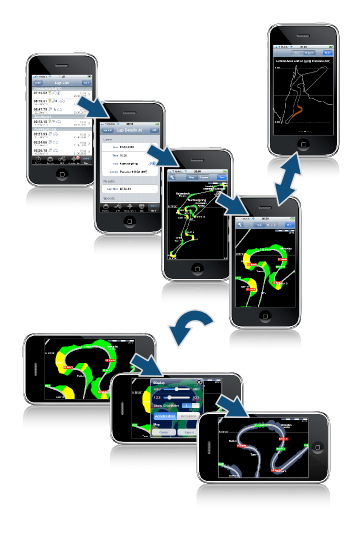
Selecting one of the laps you start browsing through the information recorded for this lap. It starts with the Lap Details View and leads you to the Map and Histogram Views. In the Map View, there is a further hover view available to configure the presentation. The Map view can be rotated. The Histogram View shows speed, height, lateral and lineal acceleration for the whole lap. Zooming into the histogram highlights the section of the track that is visible in the histogram.

Satellites and GPS View
Acceleration View / Calibration
Points of Interest and Map View
Trip Computer View


Position Source
Position Quality / Accuracy
Online Status (see Online Racing)
-
✦System status is presented in the bottom of the screen, right above the tab bar:
-
✦Furthermore the navigation bar has buttons for standard actions:
Speedometer View
ADD-ONS
Automatic timing and data recording is LapTimer‘s first and most prominent discipline. However, this discipline is based on an excellent understanding of information delivered by a GPS sensor. This information is provided by LapTimer using two views, the GPS View and the Satellites View.
The Satellites View is a feature available in LapTimer Professional by default. In LapTimer Standard, it can be added as In App Purchase. Please note that the Satellites information is available only when LapTimer has direct access to the sensor. Currently, this is the case only for the TomTom car kit. See GPS Compatibility for more information on this.
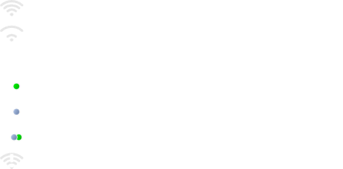
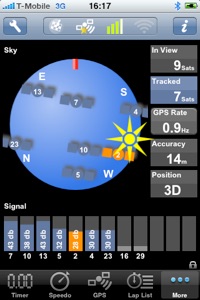
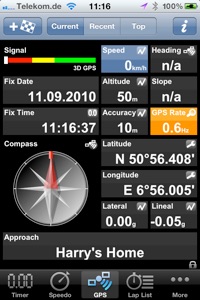
The GPS View shows GPS information like current position, time, and direction driven (Heading). The signal quality is shown as a bar. While using the internal GPS sensor, the quality is largely derived from the horizontal accuracy (which is displayed as a separate numeric field too). If an external sensor is connected and directly accessed (NMEA interface), it is derived from the number of satellites tracked. The mapping to colors is certainly arbitrary and calibrated to serve LapTimer‘s purpose: as soon as you reach green, quality should be fine for lap timing.
In addition to standard GPS data, the view mixes in the current acceleration delivered from the iPhone‘s sensor, furthermore the next Point of Interest approached is displayed in the bottom.
The GPS rate is realtime measured by LapTimer. It is calculated from the number of valid fixes the connected sensor delivers per second. As soon as receiving conditions get worse, the number of valid fixes drops and the GPS Rate does too. Update rates below 0.8 Hz are considered critical, below 0.7 Hz they as not usable any more. The GPS Rate field‘s background is filled with orange / red to signal this.
The Satellites View opens another perspective on the GPS status. It displays the position of satellites received and tracked as well, as individual satellite‘s signal strength. There are three basic states a satellites can be in: a grey bar means that the sensor knows that the satellites exists, but has not yet a position detected. As soon as the position of the satellite is available, the bar turns into orange and the satellite is displayed orange in the sky view. Satellites tracked are those satellites the sensor uses currently to calculate the position on ground. Satellites tracked are colored blue.
As a special feature, the sun‘s current position is displayed relative to the driving position. After sunset and before sunrise, the sun is invisible. As both views basically show the GPS information there is a shortcut to change between this views: simple press the GPS Rate button to switch back and forward.
Finally, the GPS View shows a little history relative to top speed. When ,Current‘, the first of three states (segmented button in the navigation bar) is selected, it shows the current GPS status including the current speed. When ,Recent‘ is selected, it shows the GPS status at the point in time since LapTimer startup, when the max speed was achieved. Last, when ,Top‘ is selected, the GPS status at the all time max speed point in time is shown. When either ,Recent‘ or ,Top‘ is selected, a ,Reset‘ button shows up to reset the respective speed.
LapTimer‘s settings are available both in the iPhone‘s Setting app and within LapTimer (Settings View). Not all settings have immediate effect, but need a restart.
Settings
Settings are available in several groups. The first group is on Online Racing. Most users will change the ,Driver ID‘ only. The Driver ID is used when times lapped are submitted to Harry‘s server for lap timer comparison. It is displayed both in the Online View and the Hall of Fame (Add-ons View). The Driver ID is made up from 3 digits (letters, numbers, etc.) and NOT unique. Please visit Online Racing for further details on LapTimer Online Racing capabilities.
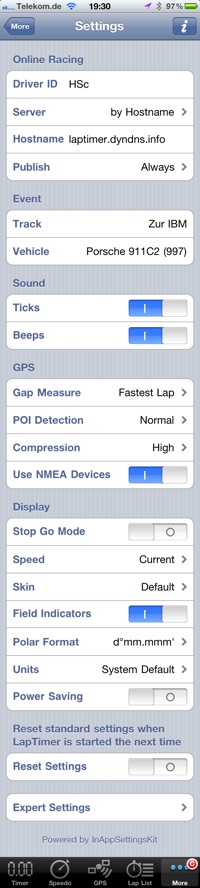
Event is read only and shows both the Track and the Vehicle currently selected. Both values are changed in one of the hover views described above.
Using ,Ticks‘, the sound played when the clock hands in the Classic Views move, can be turned on and off. ,Beeps‘ selects the general use of sound. LapTimer‘s use of sound is very limited however.
,Gap Measure‘ selects the Reference Lap as described for the Racer‘s View above. ,POI Detection‘ selects the fuzziness LapTimer allows when triggers are detected. With bad receiving conditions, select ,Wide‘, with very narrow tracks (e.g. kart tracks) and good receiving condition, ,Narrow‘ is the right selection. LapTimer produces large amounts of data while recording laps. ,Compression‘ allows a certain reduction of data amount by skipping fixes that do not add addition information as they can be interpolated. Typically straights allow high compression. Finally ,Use of NMEA devices‘ allows turning off the TomTom and G-Fi (more to be added) support.
,Stop Go Mode‘ is a setting from the times when LapTimer had no GPS support and was operated manual. It defines which buttons are shown when LapTimer is started manually. With ,Stop Go Mode‘ on, a ,Next‘ button will appear (instead of ,Stop‘) when timing is started. This allows stopping the current lap and immediately starting the next.
,Speed‘ selects the fix shown in the GPS View. Selection ,Current‘ will continuously update the fields with the current values delivered by the sensors. The other values select either the values when the vehicles was driven fastest overall or since the last start of LapTimer (Recent). Versions 10.5 an higher support skins. Changing ,Skin‘ is immediately effective when changed. ,High Contrast‘ is not particular nice, but good for very bright / sunny days. ,Field Indicators‘ select if fields with any kind of interaction (e. g. changing display accuracy, or bringing up a detail view) show a small field indicator in the top right corner. Turning it off will change this fields to a typical button layout - but without indicator on the kind of action that takes place when pressed. ,Polar Format‘ and ,Units‘ should be straight forward, for the later, ,System Default‘ is almost always correct. Finally, ,Power Saving‘ selects if LapTimer will dim the screen after a few minutes. It will continue recording however. With a power supply attached, power saving will be switched off typically.
,Reset Settings‘ is used in seldom situations when LapTimer needs a complete reset. ,Expert Settings‘ must not be used without advise of the author, they are not documented here.


Copyright © 2006-2011, Harald Schlangmann. All rights reserved. Last revised: 16th Jul 2011
-
✦If field indicators are set to ,On‘, active fields give an indication on the function triggered:
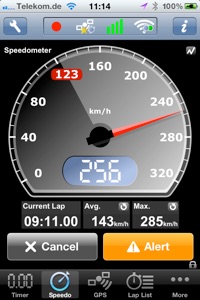
Actually another timer view (see section above), Speedometer View is completely dedicated to speed and a good companion while driving. The large display does not only show the current speed driven, but does show the last straight‘s or curve‘s speed in addition. In the example to the left, the current speed driven is 256 km/h. The speed was continuously increased starting with a minimum of 123 km/h. This is a typical situation when passing a turn (with a minimum speed of 123 km/h) and accelerating afterwards. As soon as a max speed is reached and decreases afterwards (e. g. because you are braking), the display will flip and show the max speed in green.
The average speed shown (,Avg‘) is the average speed moving, touching the field will reset this value. ,Max‘ speed is the maximum speed driven since LapTimer was started the last time. Again, touching the field will reset this speed.
Speedometer view is available in LapTimer Professional. For LapTimer‘s standard version, it can be added using InApp purchase.


Depending on the product version, LapTimer offers both functional enhancements and sets of points of interest as downloads. The Add-ons View is the entry point for all this additions (in the factory configuration you need to follow the More tab bar item to access it).
The list of Add-ons is configured on Harry‘s server - and updated regularly. LapTimer will refresh the list on your device from time to time. Pressing the left bar button of the Add-ons View will force an instant list update.
Add-ons are organized in groups. The first group is the Features group holding so-called InApp purchase offerings. Most of the features add additional views, some add other functionality. LapTimer Professional does not have this group as all feature additions are available by default.
The features show their current status (which is ,Active‘ if the feature is purchased and available locally). To purchase a new feature, you select it from the Add-ons View, watch the description and previews, and finally purchase them using your iTunes account.
In case the local purchase status is getting out of sync with what you purchased, the local status can be refreshed by simply repeating the purchase process. Please note that the dialogs will make you feel like purchasing the feature again. There will be a final dialog confirming that you purchased the product already and will not be charged again. The correct purchase status is stored in the App Store and is linked to your iTunes account.
One of the most powerful features are LapTimer‘s downloadable Track Sets. The concept, creation, and certification is described in depth on the Tracks page. Once a track is certified, it will appear in the Add-ons View, sorted by geography.
The picture to the right shows a complete track set view. The entry ,POI Set‘ shows both the name for the track within LapTimer and a unique ID used for all kinds of online racing.
,Title‘, ,Description‘, ,Snapshot‘, and ,Source‘ show some information on the track set. In case a snapshot is provided, it can by enlarged / zoomed by tapping into it.
The entry ,Status‘ is used to actually download the track set to your device and enable it. You may create, delete, reload Track Sets as you like and without losing information.
Another interactive part of the Track Set View is the Hall of Fame. The hall of fame shows all laps recorded around the world for the specific track set ID (see above and on page Online Racing).
As the hall of fame can get particular long for popular tracks, there are some filters that can be applied to the list. Enabling the ,Time‘ filter will hide all laps not matching the lap time range given. The ,Distance‘ filter will hide all laps with a distance driven not being approximately equal to a reference distance given. Please note that this two filters will not be available for every track set. The last filter is the ,Drivers‘ filter. It will simply hide all laps driven by someone without a customized driver ID.
The hall of fame‘s entries show the time lapped, the date and time (local time of the driver), and the driver ID and vehicle if available.


Let‘s have a deeper look into a Lap Details View. The picture to the left shows a single lap recorded in September 2010. It has a number of optional properties available, like a video recorded and a bunch of intermediate times.
The Lap Details View starts with some information on the overall event. Date and Time are recorded automatically and cannot be changed. The time shown is local time.
Every lap belongs to a track named here. All laps not recorded for a specific track are grouped in ,Unspecified‘. If a lap is recorded using a trigger, the track set the trigger belongs to, is set as the track. The track can be changed by pressing the Edit button and selecting another track.
This, by the way, is standard behavior. As long as the Lap Details View is in edit mode, the entry can be changed / selected. As long as the view is in view mode, the entry will be displayed in more detail (if available). Vehicle and Video behave in the same way as track here.
Rows showing a details disclosure indicator will bring you to the Data Recording Views including both the Map and the Diagram View (see pictures above).
The Results section gives the timing results. Lap Time is the overall time and always available. Intermediates are only available when the lap time was split using intermediate triggers. For each track section both the absolute time from the start, and the time since the last intermediate are shown. Intermediates can be purged when in edit mode.
Speeds and Track Info gives some statistics on the data recording, the meaning should be straight forward.
Regularity is a special feature that can be used for regularity events. With a target speed given (Speed), LapTimer calculates the time gap resulting from any deviation in average speed. The first section for example was driven with an average speed of 122.1 km/h instead of 124.0) resulting an a gap of 0.52 seconds. Summing up all the time gaps (negative gaps are made positive), an overall penalty ob 15.32 seconds results and is displayed.
The last section offers a bunch of buttons with functions available for the lap. Visibility of the respective buttons depend on the lap‘s data and available context. As an example, ,Overlay‘ is only visible, when both GPS data and video recording is available.
Lap Details
,Reference‘ make the current lap the reference lap. Reference laps were introduced above. In case this button is not visible, the current lap is the reference lap already. ,Export‘ brings up a dialog with all kinds of exports offered. Please note, that PDF export is available in the Data Recording Map View only. ,Send‘ is for transferring the lap‘s data to another device around. ,Purge GPS‘ deletes all GPS data collected for the lap. The lap itself will remain in the list. Please note that LapTimer‘s storage is limited and purging GPS data for older recordings makes sense from time to time. ,Recalculate‘ replaces the current acceleration measurement by a calculated value. Lateral and lineal acceleration can be calculated by taking driven radiuses and speed into account. This operation is destructive, measured accelerations will not be available afterwards. ,Overlay‘ will add a dashboard based on data recording to a video recorded. See Video for further information. Finally ,Delete‘ removes both data recording and lap data from LapTimer‘s databases.
Video View

OBD support adds a small but interesting number of additional information relevant for racers. LapTimer completely focusses on track day relevant information and omits a lot of bells and whistles typically supplied by OBD tools.
OBD Information
To get reasonable results, you need to configure both max. torque and max. power. An example is displayed to the left.
The units of measure can be configured in Settings, LapTimer will work with PS, HP, and kW. LapTimer will display the rpm range between max. torque and max. power as ,green‘ and values above max. power as ,red‘.
Please note that the update rate and the range of data delivered depends strongly on the car driven. LapTimer detects the standardized codes available, and displays them in Vehicle Details (see ,Commands‘) as a kind of system information. More information on OBD is available here.
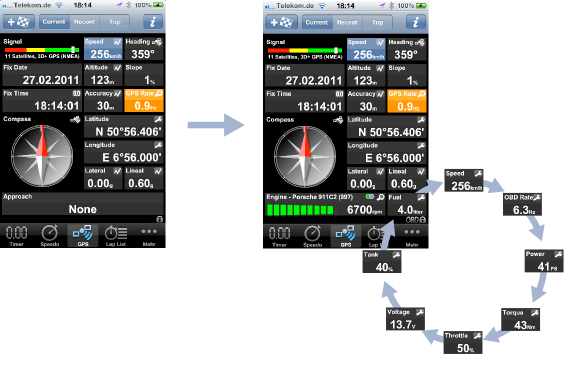
The snapshots above show OBD specific information
available with an OBD sensor connected. The second
screen is the GPS View with the OBD Gadget displayed
after a device has been connected. Tap into the ,Fuel‘
gadget to go through OBD data and derived values available.
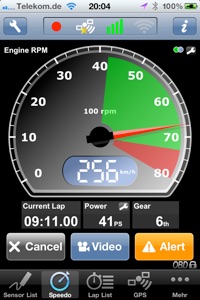
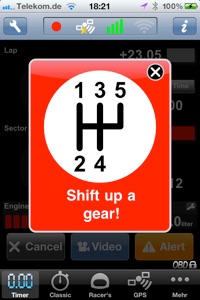
For racing, the most interesting data is the rounds per minute the engine is running. With given engine characteristics (rpm at which max. torque and max. power is available), LapTimer can both display the ,good‘ range of rpm you should use, and warn once you get too high. The flashing Shift Gear Alert shown below will come up as soon as the max rounds per minute for your vehicle is nearly reached.
The red / green color codes are used both in the Engine gadget above, and in the rpm dash when video overlaying is done.

Most, but not all cars compatible with OBD II deliver their vehicle identification number (VIN) when connected. LapTimer uses this number to associate the data coming in with a vehicle from LapTimer‘s vehicles database. The first time a car is connected using the OBD port, LapTimer will ask you to select one of your vehicles to be associated.
The OBD section shown to the left is available only when an OBD sensor is connected. The long section named ,Commands‘ shows the PIDs reported available by your car. PIDs ("Parameter IDs") are codes used to request data from the vehicle. Those PIDs actually used by LapTimer, will show some diagnostic information, especially how long it takes to request the specific piece of information.
The section ,Power Transmission‘ can be configured to show the vehicles transmission characteristics. Gears can be added and removed in edit mode. Resulting speeds by gear are calculated and displayed based on the ratios, the wheel size (and the wheel driven), and the max power rpm.
In case OBD information is available from a sensor connected to LapTimer, the power transmission parameters are used for gear calculation. Please note that without proper configuration of your vehicle‘s parameters, the gear calculation will produce wrong results.
,Delete‘ will delete the vehicle including all data. Laps recorded for the vehicle are linked to ,Unspecified‘ vehicle. ,Reset‘ will revert all settings except the name of the vehicle to some defaults defined by vehicle type. Finally, pressing the ,Current‘ button will make the vehicle displayed the current vehicle.
As soon as an OBD sensor is connected, the Speedo View will turn into an rev counter showing the engines‘s current rpm. Again, the green area gives you a hint on a ,good‘ area in green starting at the rpms your engine delivers best torque and ending at the rpms your engine delivers max power.
The average speed gadget shown above is replaced by a power gadget, the max speed gadget by the current gear used (calculated). Tapping into the dashboard will switch between Speedo View and the revenue counter view.