Tracks and Points of Interest

Introduction
LapTimer version 10 introduced the powerful concept of certified Track Sets. A Track Set is a set of triggers and other points of interest. Track Sets can be defined and submitted for certification. Once certified, the Track Set can be downloaded by any LapTimer user in the world.
Certified Track Sets allow a very easy setup of LapTimer for your favorite tracks. You just start LapTimer, and download the Track Set you need. Everything else is working automatically.
Using certified Tracks Sets, reliable comparison between times lapped is possible. In case online update is enabled on your device, times lapped will be submitted to Harry‘s Server. They can be compared as they are generated by the certified triggers contained in the track set. For Online Racing, please follow this link.
Tracks Sets can be a collection of Points of Interest and Alerts too. In this case (no triggers), this sets are named POI Sets.
The remainder of this pages gives an overview on both the use and the creation of Track Sets and POI Sets. Most of today's Track Sets have been created by users, your contribution is highly appreciated.
In case you have sets of GPS coordinates available that make up interesting information, please let us know. An example of such a set is the 'Large Cities' POI set available. It contains all larger cities in Germany, they will be displayed in Maps view an in the data recording area. Please make sure that there are no rights reserved.
Accessing and Using Track Sets
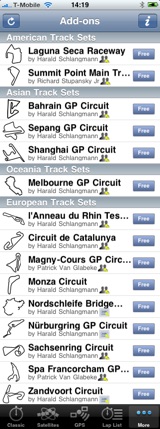
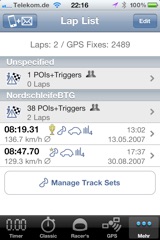
Available certified Track Sets are presented in LapTimer‘s Add-ons View or Tracks View. To use a Track Set, it needs to be loaded onto your iPhone. To load it, select the Track Set and press the Load button. LapTimer will show the download progress, display the number of POIs imported, and forward you to the list of laps sorted by track finally.
The Lap List shows all laps sorted by Track Sets. The first entry is the group of POIs+Triggers belonging to the track set. To make an example, selecting the 'Nordschleife Bridge to Gate' track set in Add-ons, will download 46 POIs including 5 triggers. They will appear in a section named 'NordschleifeBTG'. The 5 triggers are made up from one 'Go' trigger, one 'Stop' trigger, and 3 'Intermediate' triggers.
Creating a Track Set on your own
To understand the basic steps to define a Track Set, the following pictures give a step by step instruction. This is one way to proceed, there are several others. The Track Set we create is minimalistic, it has one Stop/Go trigger only. Track Sets you want to submit to the community require more triggers and POIs, but understand one, is understand all. :-)
The certification status is shown for all POI Sets, Track Sets, and single Points of Interest:

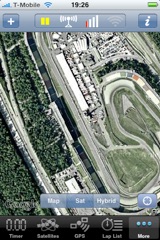
We start by creating the trigger, the Track Set is not defined at this point of time. For this step by step, we use the Hockenheim Ring, a GP track near the city of Hockenheim in Germany. The picture to the left shows both the paddock area and the start / finish straight.
Using Maps is the best approach to define POIs when you are not 'on site'. Position the start / finish line approximately in the center of the view. Use the standard gestures for dragging the map, and zoom in / out. Do not forget to disable the 'follow my position' function in the bottom right as the map will move back to your current position otherwise.
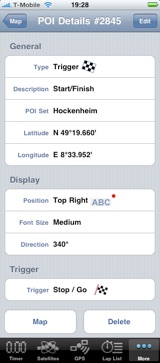
Press the '+ Flag' button to create a new trigger - a view with the new trigger's details will pop up. LapTimer creates a trigger by default (opposed to other POI types like 'Alerts' and simple 'Information'). Do not edit the 'Type' here.
Enter a 'Description' to get a valid label to be shown in any map or video. This is especially important for 'Information' points of interest, as they are displayed as text. Triggers have a standard description (e. g. 'Stop/Go').
The next field 'POI Set' defines the set the trigger is belonging to. In case you leave this field empty, the trigger will not be associated with a track - which is something you do not want to have. Tapping into the 'POI Set' row will bring up a list of the tracks currently defined. Select one, or add a new one by tapping into the last row 'Add Track...' (press 'Edit' first to get this row). Creating a track means creating a POI Set in the background. In our sample, a new track named 'Hockenheim' has been created and selected as the trigger‘s POI Set.
We leave the Longitude and Latitude as it is at this point in time. We will adjust it later.
The 'Display' section defines several parameters for POI display. The 'Position' field defines how the label is positioned relatively to the GPS coordinate. In our case, we place the label 'Start/Finish' below and left of the GPS coordinate. In general, font size 'Medium' should be used for track POIs. An exception is a large label overlaying the whole track with the track‘s name, e.g. 'Hockenheim'. We do not use this here. 'Direction' is a tricky one, it defines the standard driving direction at this point and is both used to display a real start / finish line instead of a checkered flag, and allows LapTimer to detect triggers more reliable.
The last field is the trigger type. Select the one you need, at Hockenheim 'Stop/Go' is appropriate.
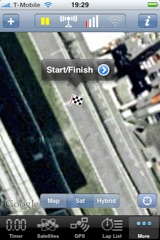
After closing the POI Detail view, we are back in the Maps view. Now it time to fine-adjust the position of the trigger. Zoom in as far as possible and drag the trigger to the point on map that is correct.
Actually, all the steps necessary are done now. LapTimer will trigger a new lap every time you pass the Stop/Go trigger we have defined. It will store each time lapped including it data recordings as one of the ,Hockenheim‘ laps.
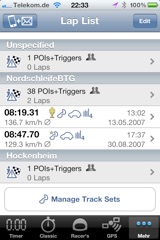
To check the POI / Track Set created, we navigate to the Lap List and follow the group of POIs+Triggers now:
As you can see, a new POI Set has been added, it is displayed as a user defined track set, and is made up from 1 POI (the trigger defined above). As no laps were recorded so far, the lap number displayed is zero.
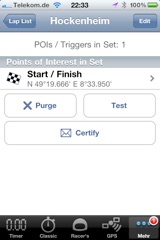
Selecting 'Hockenheim' brings you to the POI List view. It shows the list of POIs for this set and offers a number of actions you can be applied now.
There are two actions recommended before you certify a track. The first one is a 'real life' test. This is so important as it verifies the correct position of all triggers. The maps shown are not necessarily accurate, so testing is important.
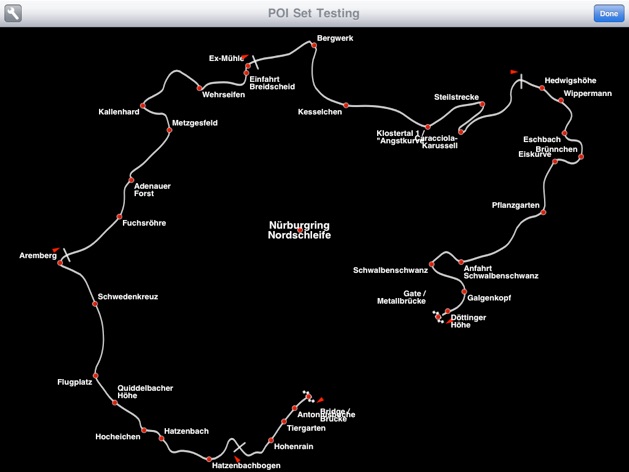
The 'Test' action brings up a map view to test the display parameters entered for all the POIs defined. As we have no recordings for the track so far, we use my favorite track as an example here:
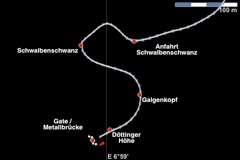
The example to the left shows the final section of Nordschleife track, right ahead of 'Gantry‘. In test mode, the exact position of the trigger is displayed as a red dot. The labels are positioned according to the display fields above. In this example 'Schwalbenschwanz' has a 'Top Right' position like our trigger above had. Please have a look at the 'Stop' trigger too: it is named 'Gate / Metallbrücke' and has a position 'Bottom Right'. The finishing line is turned in driving direction.
Once tested and used, please submit your work for certification. It will be of great value for other drivers visiting your track. It will also make it possible to compare times lapped as the same conditions and positions are confirmed. To help you understand what is needed to create a perfect track set, LapTimer shows your current track set's rating. Please add as much content as possible, I will do the rest.
Once you press the 'Certify' button, a mail containing a XML description of your POI set is generated. Please add the additional description requested and send it to LapTimer@gmx.de. You will receive a notice once the Track Set is online.
POI Sets
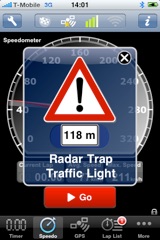
PLEASE NOTE THAT USING ALERTS FOR SPEED TRAPS IS NOT ALLOWED IN SEVERAL COUNTRIES. USE ONLY IF REGULATIONS IN YOUR COUNTRY ALLOW!
-
1.Register at SCDB.info for free
-
2.Log in and download google_earth_scdb.kmz for the countries you need
-
3.Uncompress the file downloaded using 'unzip google_earth_scdb.kmz' or another tool
-
4.Upload ,google_earth_scdb.kml‘ to any web site you have access to
-
5.Select the 'Stationary Speed Traps' POI Set from the Add-ons View
-
6.Enter the URL you have uploaded your KML file to
-
7.LapTimer starts import and creates POI Set named 'Speed Traps'
Another model is the support of Google Earth KML files. In version 10 and above, support for speed trap descriptions from www.scdb.info is included. To load the speed traps into LapTimer, please follow the description below. Once uploaded, you have a radar warner included in LapTimer.
Copyright © 2006-2014, Harald Schlangmann. All rights reserved. Last revised: 31rd Aug 2014
Track Sets currently available
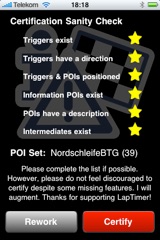
Here is an example of a 'perfect' six star track set including triggers and POIs:


Please follow Full List of Tracks to see Track Sets and POI Sets available currently.
LapTimer v16.5 introduced a more rigid quality rating for track sets made available in 'Tracks'. This quality rating reflects the formal quality a track set defined shows. Elements rated are:
Track Set Submission Policy
-
✦Existence of triggers (mandatory): for track sets (opposed to POI sets) there needs to be at least one trigger that starts, and one that stops - or a stop / go trigger combining this actions
-
✦Driving direction (mandatory) given for the triggers; LapTimer will use this information not only for display, but for trigger detection starting in version 17
-
✦Label position information allowing LapTimer to place POI labels in a position they do not intersect with the track when it is displayed
-
✦Additional POIs for bends and other items of interest (they are used for Video overlay inserts too, so this is of real value)
-
✦Explicit description for each trigger (e.g. 'Split 3').
-
✦Up to 8 split triggers (mandatory): 1-4 preferred, a typical GP track should have 2 or 3
Any set submitted needs to feature at least 4 stars with the marked items being mandatory.
The reason we have tightened the policies is mainly user experience. Any track set available in LapTimer is downloaded multiple times, and by many many users. A user downloading a track set will expect it to work - as it is certified. The above formal checking is not good enough to make sure the track set works, but it is a good indicator things are fine.
As we appreciate any submission a lot, and we are aware it is not an easy task, we will certainly help were ever we can. So in case you have a problem getting the stars shine, drop us a note and we will check what is going on.
Even with your kind help, adding a track set is a lot of work. We need to paint a track shape and add multiple items to the track description to make it work. So besides the above quality rating, add a good textual description of the track to the mail generated during certification, and add the configuration's track length when ever possible. These items are hard to find out from remote - especially as track submissions have shifted to smaller ones some time ago (the tracks database is pretty complete today).