Transferring Videos

Overview
Starting with version 17 of LapTimer, multiple cameras recording multiple videos for one lap are supported. The level of integration differs depending on the MultiCam used (iOS or GoPro) as the interfaces offer different functionality. One critical part of integration is the transfer of footage from the satellite cam to the master cam / overlaying device. This page gives you a how-to for transferring MultiCam videos to you master device.
iOS MultiCam
When recording, LapTimer will link both the master video and iOS satellite videos to the lap recorded. It will tag the videos in a way LapTimer is able to recognize it even if renamed or moved around. So adding a MultiCam video is actually the sole copy of the video. Two approaches are supported:
-
1.Start the MultiCam app
-
2.Navigate to the Recording List and select the video you want to transfer
-
3.In case the line 'Source' shows 'Camera Roll', continue with step 5
-
4.Scroll to the bottom of the Video Details and press 'Move', this will copy the video from the MultiCam's Recordings to the Photo app
-
5.Synchronize your Photos (including the Videos) with your desktop
-
6.Connect your master device to iTunes and synchronize once the above step is finished
-
7.Restart the LapTimer app, select the Lap you want to overlay and start the process as usual
Two caveats: Firstly, step 5 and 6 assume you have a working synchronization up and running for both the LapTimer and MultiCam device. Check your iTunes documentation in case you have questions in this area. The important item is you need to use the 'Photo' synchronization as only this area can be accessed by 3rd party apps. Secondly, watch the space available - both on the MultiCam and the LapTimer device. It is recommended to record videos being used as 'picture in picture' in single density, not HD or Full HD.
GoPro MultiCam VIDEO TRANSFER
GoPro MultiCam recording integration differs in a number of points. In general, the integration is handicapped by missing official support for 3rd party apps by GoPro. In case this changes in the future, integration can be improved.
-
1.It is not possible to tag videos automatically. This mean videos need to be tagged manually to allow LapTimer to recognize the video as belonging to the individual laps
-
2.None of the HD GoPro / HERO video formats can be used on an iPhone directly. So videos to be overlaid on the iPhone need a conversation on you desktop
-
3.Although a transfer using the wifi connection between the GoPro and the iOS master is technically feasible, access to the individual files is not available currently. So independent of the video format topic above, there is a second reason a direct transfer is not possible
And here is the step by step on how to transfer a GoPro video to your iPhone device:
-
1.Connect the Micro SD card with GoPro video footage to your desktop
-
2.Copy the video you want to transfer to your iPhone to the desktop
-
3.Make sure you use the photo(!) synchronization in iTunes, not the video synchronization... iTunes allows video synchronization to both the iPhone’s Photo Library, and the iPhone’s video app. The later is not accessible by 3rd party apps, so LapTimer expects the video to by copied to the Photo Library
-
4.Convert the video to any format accepted by iPhone. iTunes will raise an error later in the process in case the format is not usable. There are lots of video converters available. In case you use a Mac, you may simply use the Quicktime Player's Export to iTunes
-
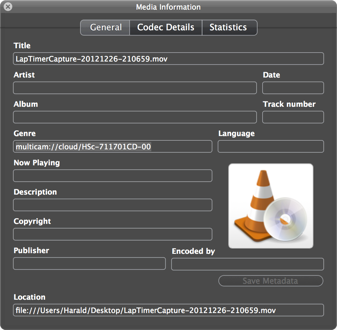
5.Once the video is converted, add the MultiCam ID / tag to the video. The picture below shows a sample using VLC - a free video viewer. To identify the MultiCam ID to be entered, check the Video Details of your lap. It is probably easiest to press the small question mark button directly to the left of the "OFFLINE VIDEO" thumbnail
Here is the official workflow to copy a video from a MultiCam satellite to the master:
-
1.Using iCloud to get a automatic transfer of footage from the MultiCam app to LapTimer
-
2.A manual workflow to transfer the footage using iTunes and your desktop
Video transfer using iCloud
To use this - recommended - approach, you need to get an iCloud account from Apple and sign in on both your MultiCam and LapTimer devices. With standard settings, MultiCam will automatically move footage recorded into the cloud. Once LapTimer discovers footage in the cloud, it will move it to its recording area thus removing it from the cloud and the MultiCam device.
Doing the Video transfer manually on iOS
-
6.Next, place the video in the location iTunes will access during synchronization
-
7.Connect your master device to iTunes and synchronize once the above step is finished
-
8.Restart the LapTimer app, select the Lap you want to overlay and start the process as usual
-
1.Videos are huge and iCloud works in background: it may take quite some time until the MultiCam video appears in LapTimer - so please be patient
-
2.iCloud synchronization works while you are connected to a wifi. Please do not allow synchronization while being in a cellular network only. Transferring videos through 3G networks is time and probably cost-intensive.
-
3.Make sure you have the automatic transfer settings turned on:
LapTimer ‣ Settings ‣ iCloud ‣ Auto Receive Videos
MultiCam ‣ Settings ‣ Auto Sent Videos
In case things do not work as expected:
Copyright © 2006-2013, Harald Schlangmann. All rights reserved. Last revised: 27th Oct 2013